| Overview |
| Features |
| Download |
| User Manual |
| Feedback |
| Credits |
| Publications |
| Links |
User manual for sipc version 2.0
Main interface
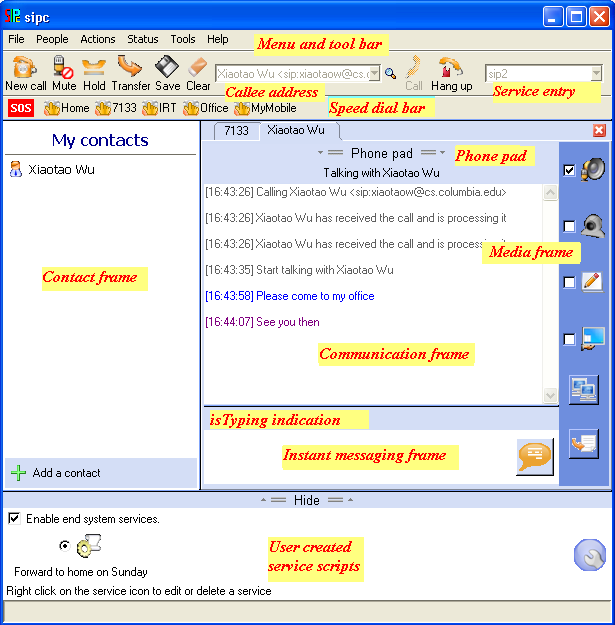
sipc's main interface consists of menu, tool bar,
speed dial bar, contact frame, communication frame, media frame,
instant messaging frame and service frame.
All functions can be accessed throught menu items. Tool bar
contains buttons people often use for Internet telephony calls.
A user can put some often used URLs in the speed dial bar to
expediate dialing process. Contact frame handles buddies' presence
and other status information, such as buddies' location and media capabilities.
Communication frame displays call status and instant messaging history.
If a user want to use phone pad digits (e.g., generate DTMF tones),
she can click on the 'Phone pad' bar to use
the phone pad.
Instant messaing frame handles instant messaging input, and is-typing
indication. Media frame allows users to pick up available media for
Internet telephony calls. Currently, sipc supports
audio  , video
  ,
white board
,
white board  , and desktop sharing
 . Service frame maintains end system services
in
. Service frame maintains end system services
in sipc.
Installation and configuration
On Windows machines, users can simply run 'setup.exe' to install
sipc. After installation, sipc will be the
default application to handle SIP URLs, e.g., click on the link
sip:bob@examples.com will invoke
sipc to make a SIP call. On Linux and Solaris, simply
untar sipc.tar.gz can get sipc installed.
If a user is running sipc for the first time, the 'Preference' dialog will pop up to ask the user to input the configuration information. A user can always change the configuration information by using 'File/Preference' menu item.
Preference dialog -- General tab
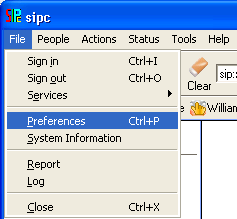
sipcFile menu
The General
tab of Preference dialog allows users to
configure his/her identity. sipc uses users' email addresses
with prefix sip: as SIP addresses for outgoing messages.
The Connection
tab allows users to choose available services and decide what kind of
protocol to use. In general, users should choose "Use automatically
detected services" so sipc will use the servers
in DNS SRV recordes for registration and making outgoing calls.
Preference dialog -- Connection tab
The Advanced
tab handles some advancded configuration.
-
In a mobile environment, the IP address of the computer is likely to be changed. With checking the 'Periodically checking IP address ...', sipc will perform the checking periodically. When sipc detects the IP address change, it will automatically send re-INVITE for all the existing sessions and update registration information to all the registrars.
-
sipc uses external STUN program for NAT traversal. The output of the STUN client should be like <IP address>[space]<port>[space]<NAT Type>. One example implementation is Columbia University's implementation.
Preference dialog -- Advanced tab
All the configuration information are saved in the $HOME/.sipc directory. The following is the description of the files in the $HOME/.sipc (on Windows, in C:\Documents and Settings\<user>\.sipc) directory.
| File/directory | Description |
| sipc.conf | Main configuration file |
| media.conf | Media configuration file, stores the port and codec information for each media type |
| mimecap | The mapping between media type and media application |
| addressbook.db | Addressbook database, we are using Metakit as the database management system and using LDIF as the format to store address information. |
| history | The most recent call addresses |
| registry.db | The information related to registrars, such as the expiration date of the registration. |
| sipc.license | License key |
| sipc.log | Log file that contains SIP messages. |
| sip.dbg | Debug output file. |
| devices/ | Device configuration files, currently, only contains the configuration file for x10 devices |
| events/ | Event package information (presence.xml and x10.xml), subscribers (subscribe.xml) and watchers (watch.xml). Subscriber and watcher information will be saved in the addressbook. |
| services/ | Service script, services/cgi stores CGI script, services/cpl stores CPL script |
| audio/ | Audio files for ring tone |
Audio device configuration
Usually, there is no need to configure audio devices on Windows platform except to adjust the volume of the microphone and the speaker. Please see Linux audio devices on how to configure the audio devices.USB audio devices
Linux audio devices
If audio does not work on your Linux machine, please try to install ALSA on your Linux machine. For more information about ALSA, please see http://www.alsa-project.org. Note: you will need root access to the machine to run some/all of these commands! This has been tested on IBM A30 laptop running Linux.- download the alsa code from http://www.alsa-project.org.
- unpack and build the drivers (You may go to the ALSA 'Supported soundcards' link to find out the step-by-step instructions for installing the driver).
- unpack and build the libraries, utilities, oss-compatibility stuff
- run "alsaconf" to find your sound card & configure your /etc/modules.conf file
- run "chkconfig --add alsasound" to add the alsasound to system startup (/etc/init.d) services
- reboot and give it a try!
Run sipc
Sipc can be started by clicking on its icon or from the command line. In addition, sipc can also be invoked from a web browser.
sipc [-call immediately|manual]
[-audio]
[-video]
[-wb]
[-subject string]
[destination-address]
-call immediately | manual If immediately is specified, the call is placed without further user interaction when sipc starts up. If the manual argument is given, sipc does not place the call when it starts up, but waits for the user to press the call button. If -call is not specified, the default value is immediately if a destination-address argument is available and manual otherwise. -audio Add an audio stream to the call. -video Add a video stream to the call. -wb Add a white board to the call. -subject string Use the subject line string. If -subject is not specified, the call will not have a subject indication. destination-address Specify the destination address for the call. Typically, this is a SIP URL.
Making an outgoing call
Main interface
At the main interface, to make a call,
a user needs to input the callee's URL in the location entry, then
click on the call button ( ). For every
outgoing call, the user can choose to use a specific service (outbound proxy)
to make the call. To choose a service, the user can select from the
service combobox, which is at the end of the tool bar.
). For every
outgoing call, the user can choose to use a specific service (outbound proxy)
to make the call. To choose a service, the user can select from the
service combobox, which is at the end of the tool bar.
sipc can host multiple conversations simultaneously on
multiple tabs. This is similar to some web browsers, like Firefox.
To create a new tab for a new call, a user can click the
New call  button, or select
the
button, or select
the Action/Start a new multimedia conversation menu item,
or type Ctrl-T keys.
An outgoing call must have at least one media checked in the media frame,
by default, an outgoing call is an audio-only call. By default, audio,
video, and white board communications are both way. For desktop sharing,
when a user check the media icon, the user needs to choose the
mode to decide whether to
Share my desktop or View remove desktop.
Mode for desktop sharing
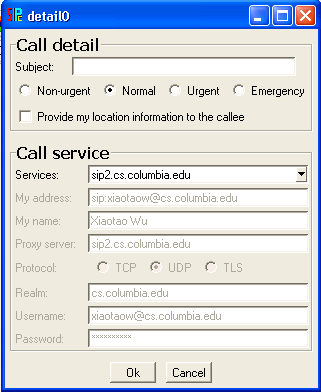
By clicking the detail  button,
a user can specify more detailed information of an outgoing call,
such as the priority and the subject of the call, and whether to send
location information to the remote party.
button,
a user can specify more detailed information of an outgoing call,
such as the priority and the subject of the call, and whether to send
location information to the remote party.
Speed dial buttons
To expediate calling process, sipc has a speed dial bar
hosting speed dial buttons. The  button will
always be in the speed dial bar for making emergency calls. To make a call
through a speed dial button, a user can simply left click the speed dial
button.
button will
always be in the speed dial bar for making emergency calls. To make a call
through a speed dial button, a user can simply left click the speed dial
button.
To add a speed dial button, a user can use the menu item
"Tools/Add a speed dial",
or right click on the speed dial bar.
A speed dial configuration dialog
will pop up to collect the information of the speed dial button.
Add a speed dial
Add a speed dial
Speed dial configuration
After adding a speed dial button, users can also edit the information
of the speed dial by
right clicking on the speed dial button,
then choose the "Properties" item.
Speed dial configuration
Phone pad
If a user want to use phone pad digits, e.g., a calling card call may require the user to input card number and password, the user can click on the 'Phone pad' bar and gets a phone pad (the text on 'Phone pad' bar will be changed to 'Hide phone pad'). The user can then click on the digits in the phone pad and have DTMF tones generated. To hide the phone pad, the user can simply click the 'Hide phone pad' bar.
Using phone pad
Incoming call handling
Incoming call handling
When an incoming call arrives at sipc, the 'New call' dialog box will be popped up. A user can choose to accept the call , explicitly reject the call, or ask the caller to make a call at a later time. The user can also block the caller so all the calls from this caller will be automatically rejected. The blocking status can be turn on or off from address book.
Show detailed information of the caller
A user can also click on the "Detailed information of ..."
bar to show detailed information
of the caller.
Once the callee accepts the call, the title of the call tab will show the name of the caller.
Mid-call handling and terminate a call
Once a session has been established, the following mid-call handling function buttons are enabled.To terminate a call, a user can simply click theHold: Hold the call in the current tab.
Mute: Mute the call in the current tab.
Transfer: Transfer the call in the current tab.
"Hang up"
 button.
Sending instant messages
Users can input text messages in the"Instant messaging frame"
as shown in the main interface. After inputting
a message, the user can click the  button,
or hit
button,
or hit <Enter> key to send the message out. If the user
want to have multiple lines in one message, he can use
Shift+<Enter> to start a new line.
Emergency services
By clicking the button, sipc
will send an outgoing call to sip:sos@<domain> after
confirmation. If sipc knows the user's location information
(see Location-based features), sipc
will automatically encode the location information in the emergency call
in MIME.
Maintaining accounts
From the "Services menu item", a user can add a new service to or maintain existing services.
Services menu
If the user chooses "Add a new service,
the "Service" dialog
will pop up. If the user chooses a specific service,
sipc will retrieve the information of that service
to fill the "Service" dialog.
From the dialog box, the user can specify what contact information he/she wants
to register. Most of the information can be filled up automatically based on
the SRV records sipc acquired from the DNS server.
Add a new service
If a user wants to do additional configuration on the contact information or want to upload some service scripts to the registrar, the user can click on the 'More Settings' button to invoke the "More settings" dialog. From the dialog, the user can add more contact information, set the expiration time of the account, or upload service scripts. Sipc bases on the suffix of the filename to decide the type of the service script. If the suffix is '.cpl', the service script will be considered a CPL script, otherwise, the service script will be considered a SIP CGI script.
More service settings
Upload service scripts to registrar
Contact list and presence information
Insipc, if a user wants to watch the
presence status of another user, the user
can click on the 'Add a contact' button ( ).
The "Add a new contact" dialog will pop up
to collect the new contact's information.
).
The "Add a new contact" dialog will pop up
to collect the new contact's information.
Add a new contact
Contact list
Once a user adds a contact, the contact will be listed in the
contact list. The contacts are grouped into different groups.
A user can click on the
 to hide the detail of the group, and
click on the
to hide the detail of the group, and
click on the  to show the detail. The
user can place the mouse over a contact to see the SIP URI of the contact.
to show the detail. The
user can place the mouse over a contact to see the SIP URI of the contact.
For each contact, the user can watch the contact's status.
If the user is online, the  icon will be displayed before the contact, otherwise,
the
icon will be displayed before the contact, otherwise,
the  will be displayed and the
contact's name is grayed.
will be displayed and the
contact's name is grayed.
Contact list
| Start a conversation | Make an outgoing call to the contact. |
| Block | A user can block a contact if the user does not like to provide his/her presence status and does not like to be annoyyed by the contact, the user can choose to block the contact. If a contact is blocked, all the subscriptions from the contact will be automatically denied. |
| Delete contact | A user can delete a contact or a contact group from the contact list. Before removing, sipc will confirm with user about the remove action. If a contact group is removed from the list, all the contacts under the group will be removed. |
| Properties | Show the properties of the contact |
Handle incoming subscriptions
When sipc receives a subscription, if sipc already starts to provide presence status information to the party sending the subscription, sipc will automatically accept the subscription and then send the current status to the subscriber. If sipc is not providing presence status to the subscriber, sipc will pop up a Incoming subscription" window asking for the user's approvance. The user can accept, deny or block the subscription. If the subscription is accepted or blocked, the subscriber will be added to the contact list so that the user can modify the contact's state (blocked or accepted) later.
Incoming subscription
By default, sipc only shows the contacts being watched
by the user. It does not show the contacts that are watching the user.
To display the contacts that are wathcing the user, the user can check
the menu item
"People/Show people watching me". sipc
will then display all contacts. The contacts wathcing the user will have
a  icon before the contacts.
Show people watching me
Address book
sipc has an address book for keeping the contact addresses, call history information as well as the presence status information.
The main interface of addressbook lists the name, the nickname, the organization, the SIP URL and the last call
made by the user. There are two columns used for presence status,
 , which indicates whether a user listed in
the address book has
subscribed to the owner of the address book; and
which indicates
the status of the user that has been subscribed by the owner of the address
book. A user can click on each column title to sort the list based on the
title the user clicks.
, which indicates whether a user listed in
the address book has
subscribed to the owner of the address book; and
which indicates
the status of the user that has been subscribed by the owner of the address
book. A user can click on each column title to sort the list based on the
title the user clicks.
Addressbook
When a user right click on an entry of the addressbook, a popup menu will be displayed. The user can perform some actions such as making a call, sending email, doing subscription, controlling device and sending an instant message to the selected address entry.
Right click on the addressbook entry
A user can add or edit the address record through the addressbook interface. The address edit interface contains three categories of information, namely 'Name' information, which provides basic user identifying information; 'Contact' information, which provides postal contact information; and 'Services' information, which provides some simple policies associated with the SIP address.
Addressbook name information


Addressbook contact information


Addressbook services information
Location-based features
sipc can detect and edit the end user's location information and
pinpoint a buddy on a map if the buddy releases its location information.
To retrieve and edit location information, a user can use
"Status/My location" menu item.
Location-based features menu
If a user choose the "Location information" menu item,
a location information dialog box will pop
up showing the user's current location, and allow the user to modify
his location.
Showing the user's own location information
Location information can be civil location and geographic location. Civil location attributes include building name, floor information etc. These attributes are also defined in a map file for matching. A map file can be a HTML file. Click here for a map file example. The map dialog is shown below. If sipc has a buddy's picture, it will show the picture on the map. Otherwise, it just shows the buddy's name on the map.
Showing the user's own civil location information
sipc can also pinpoint a position (the red dot shown in
the map below) on a local map based on geospatial coordinates.
Showing the user's own geograpic location information
With civil location, sipc can generate a query string,
and pinpoint the user on Google maps. For example, the civil address showing
in the location information dialog will generate
the following URL.
http://maps.google.com/maps?q=500+West+120th%2C+New%20York%2C+New%20York+10027%2C+US
Some very useful features for the map dialog are performing actions on a room.
By right clicking on a room, users can see all possible actions for the
room. Users can send an announcement to all the buddies in that room,
invite all the buddies in that room to join a conference, or send an
email to all the buddies in that room.

By choosing the properties of the room, users can see the detailed
information of the room and all the buddies in that room.
Users can also perform actions on a single buddy. Users can double click
on a buddy's pinpoint or his picture or name to make a call to the buddy.
Users can also right click on a buddy to show all possible actions. The
actions include 'making a call', 'sending an instant message', 'sending
an email', and show buddy properties.
Service creation
sipc can execute service scripts written in
the Language for End System Services (LESS). To enable or disable
end system services, a user can click the  bar, or use
 "Tools/Service scripts",
or type "Ctrl+S" key, then check or uncheck the
"Enable end system services" checkbutton.
Service scripts menu item
A user can click the  button to add
a new service, or
right click on an existing service to
edit or delete the existing service.
button to add
a new service, or
right click on an existing service to
edit or delete the existing service.
Service scripts menu item
When adding a new service, the service properties dialog will first pop up asking for the name and description of the service.
Service properties dialog
sipc will then invoke the
LESS service editor for service creation.
Users can drag and drop icons, and connect icons together, to build a
service decision tree.
LESS editor
When the service decision tree has been built, users can click the
"LESS" tab in the LESS editor to
check LESS scripts.
Check LESS script
Internet TV
If a user's machine can support multicast, with using sipc, the user can receive session information announced over Internet by Session Announcement Protocol (SAP). The following shows the sessions received by sipc.
Internet TV sessions
The user can select the session, choose the media and click on the 'Join Session' button to join the session. The joined sessions can be listed in the 'Joined sessions' frame. From the frame, the user can choose a session and quit the session.
Joined sessions frame
Right click on a session entry, the user can perform several functions based on the session information. The user can watch the detailed information of the session, can watch the SDP description of the session, or invite another user to watch the same Internet TV session.
Right click on a session
Detailed session information
SDP of the session
Invite another user to watch the same Internet TV session
If a user choose the 'Invite someone for session' function, a dialog will popup. The user can input the SIP address of the remote party and choose the media type and then send the invitation out.
Invite someone for session
Networked appliance control
Sipc can control the network appliances via the device gateway such as
SIP-X10 device gateway. There are different kinds
of devices, every kind of devices may have different control commands. The
control commands for a specific device type are saved in
$HOME/.sipc/devices/
Menu item for networked appliance control
Double click on a device, the device control interface will show up. A user can click on any control button to send control command to the device control gateway.Controllable networked appliances
Device control interface
Watching the SIP messages
For some advanced users, sipc provides a monitoring interface to watch the SIP messages. A user can choose "Tools/Monitor" menu item, or type the"Ctrl+W" key to start the monitor.
In addition to the SIP messages, the monitor also
displays the time and remote address of sending or receiving the SIP message.
The user can click on the 'Save' button to save the messages into a file.
In addition to the monitoring interface for watching the SIP message, sipc
also saves all the SIP messages, the timestamp of the messages and remote
address information in the $HOME/.sipc/sipc.log file automatically. The
messages are appended to the $HOME/.sipc/sipc.log file.
SIP message monitor
SIP message monitor